CAUTIONS & WARNINGS
TRAINING
Dive Xtras always recommends you obtain proper training prior to using any piece of dive equipment. All the larger dive agencies provide DPV training. If you would like training and are having difficulty finding a course, please contact us and we can try to help you find a local instructor. Reading this Piranha user manual does not constitute training.
Never ascend using the X-Scooter to pull you towards the surface.
This will cause a rapid ascent, as explained in basic diver training, and should be avoided at all times. A rapid ascent can cause serious injuries such as, but not limited to, lung overexpansion injuries, decompression illness, rupture of the ear drum, and in extreme cases, even death.
Never allow the X-Scooter to put you at risk.
If at any time during your diving activity with an X-Scooter, you feel you are at risk, immediately unclip the X-Scooter tow cord and release the X-Scooter.
Placing your hands in the way of the propeller blades can cause damage and/or injury.
Inadvertently getting your hands or other objects caught in the spinning propeller blades can cause damage to your X-Scooter as well as to you. The X-Scooter has a built-in safety feature to minimize this danger, but some damage/injury may still occur.

Be careful not to entangle hair, equipment, line and/or seaweed, etc. in the propeller.
This may cause the X-Scooter propeller to slow or even stop. Ensure you stop, releasing the trigger, and untangle whatever has caused the entanglement.
Always ensure, whenever connecting any electric connectors, to connect like colors.
Always connect red to red, black to black and white to white. Failure to do so will result in damage to your X-Scooter, battery, or charger.
Always ensure correct operation of the on/off trigger prior to use.
Always ensure you check the trigger action prior to use of the X-Scooter to ensure correct operation.
Never charge the batteries in a sealed environment.
This can cause a buildup of heat and flammable gases, leading to the possibility of an explosion. Batteries should be charged in a cool and well-ventilated area.
Always allow batteries to cool before charging or using.
The batteries may heat up during use or charging. Overheating reduces the efficiency, capacity and may even damage the battery pack.
A low voltage cutoff protects the batteries from over discharge.
The X-Scooter will shut down once the batteries have reached a minimum (low) voltage. This protects the batteries from being over discharged which may cause permanent damage to the battery. During use in the final few minutes before the battery reaches its minimum voltage, the cutoff will activate intermittently, with increasing frequency until complete cutoff at low voltage. At this point the X-Scooter
will not function until the batteries have been recharged.
An X-Scooter is considered a heavy object. Use caution when lifting.
Always use safe lifting practices when lifting X-Scooter. Bend from your knees keeping your back straight.
When transporting your X-Scooter, always ensure the X-Scooter is safe and restrained from movement.
The X-Scooter is a heavy object, always safely restrain your X-Scooter when transporting to avoid damage to the X-Scooter or bystanders.
Always check the strap is fastened correctly and nothing has gotten pinched in the seals between the nose and battery and between the battery and tail.
When assembling the scooter, it is important to ensure that nothing is caught in the seals and none of the O-rings are protruding to minimize the risk of flooding.
SPECIFICATIONS
| Model/Specifications | Piranha P1 | Piranha P2 | Piranha P3 |
| Depth Rating | 600ft; 180m | 600ft; 180m | 600ft; 180m |
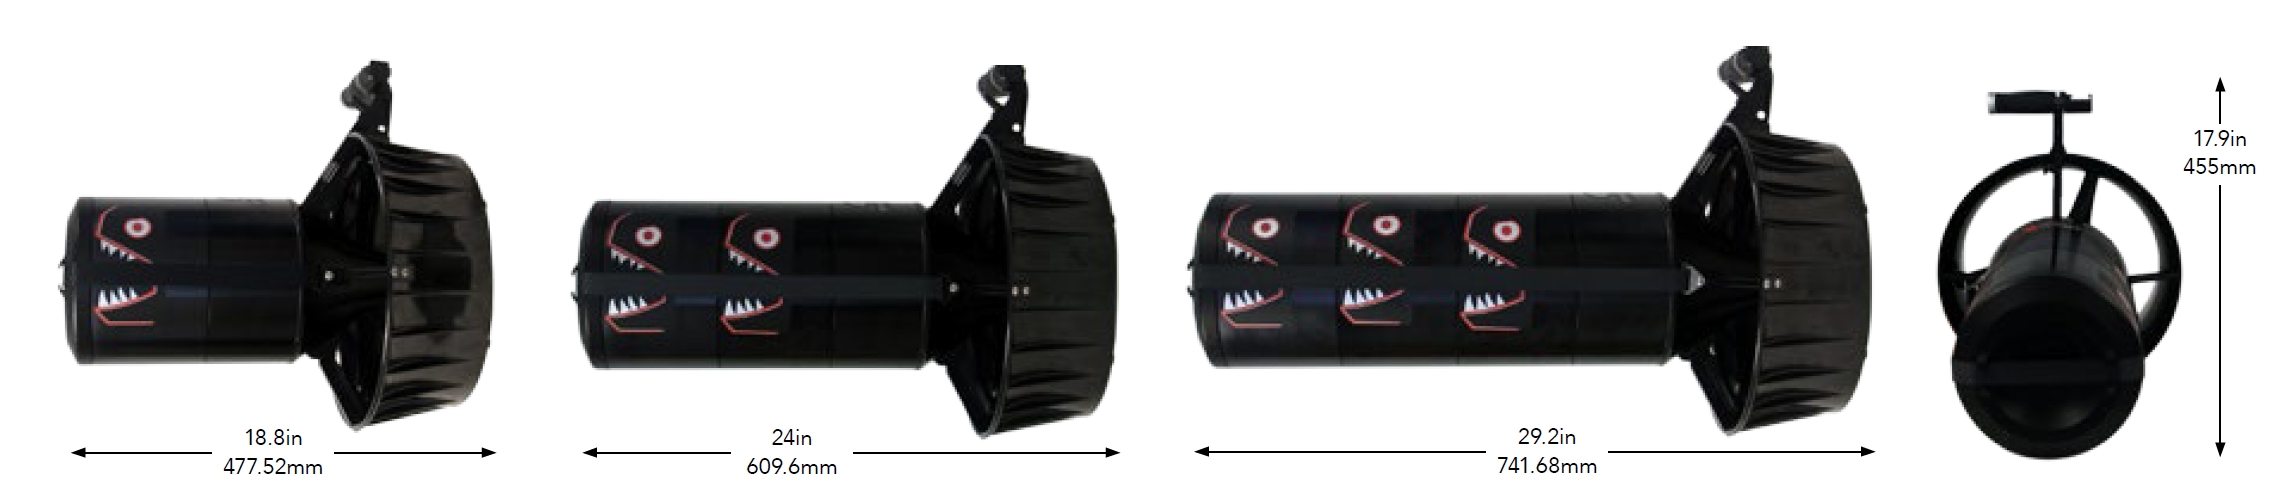
| Weight | 24.6lbs; 11kg | 34lbs; 15.5kg | 41.4lbs; 18.7kg |
| Max Thrust | 63lbs; 29kg | 63lbs; 29kg | 63lbs; 29kg |
| Max Speed | 233ft/min; 71m/min | 233ft/min; 71m/min | 233ft/min; 71m/min |
| Range at Max Speed | 1.5 miles; 2.4km | 3 miles; 4.8km | 4.5 miles; 7.2km |
| Runtime at Max Speed | 45 min | 92 min | 113 min |
| Range at Cruise Speed | 3.4 miles; 5.6km | 6.8 miles; 10.9km | 10.2 miles; 16.4km |
| Runtime at Cruise Speed | 120 min | 240 min | 360 min |
MODULAR DESIGN
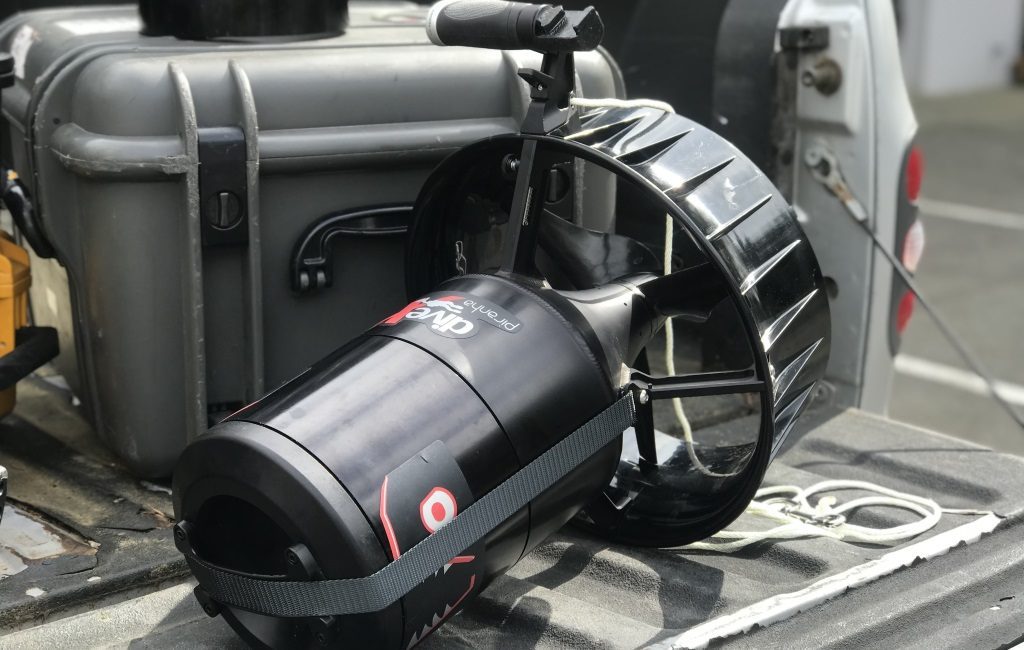
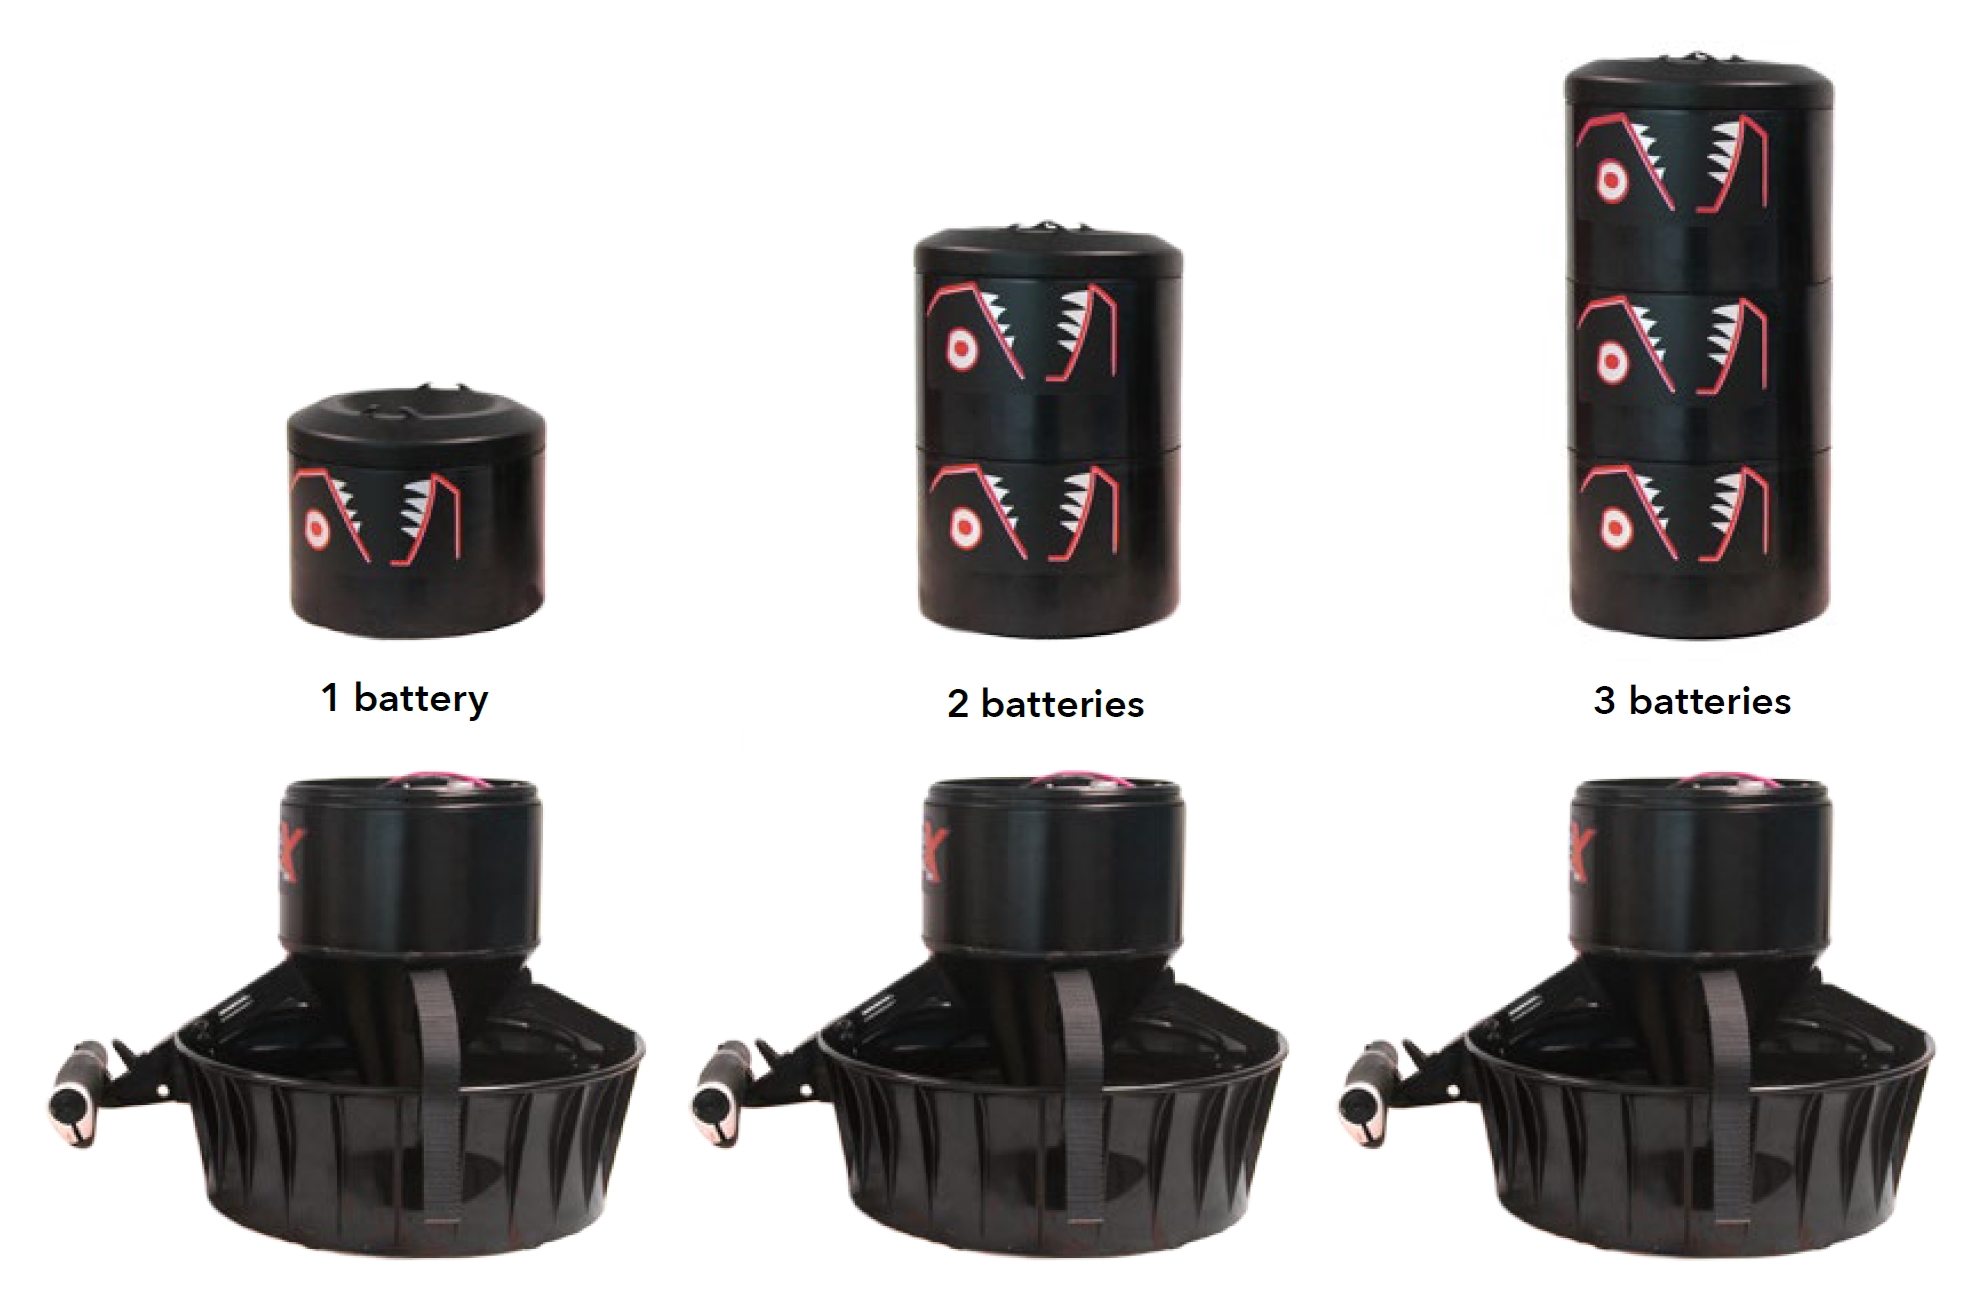
The Piranha brings back the original idea we had when we first developed the Sierra Scooter, a modular platform that lends itself to multiple batteries for a variety of different dives.
The majority of divers will use the Piranha P1, the single battery unit producing 120 minutes of run time and weighing 24.6lb/11kg. However, if you’re diving in a strong current with lots of extra bottles, or in a cave, you might want the security of having double or triple the amount of burn time. Luckily, that’s simple. To add a second or third battery, simply remove the nose, attach the top connectors to the new battery, like the motor, and place the new section on the scooter.
SETUP
- Ensure all O-Ring sealing surfaces are installed properly, are well lubricated, and do not have any cracks or gouges.
- Ensure the proper weight is installed for the type of water you are diving in. Battery and nose, with and without saltwater plates.
- Ensure secondary battery terminal is secured.
- Ensure the motor is connected to the battery.
- Attach battery section to tail, ensuring arrow is pointed toward the 6 o’clock position.
- Install PTB modules and press button to turn module on.
- Pull trigger quickly to test connection.
- Attach nose section to battery, making sure down arrow is pointed towards the 6 o’clock position.
- Slide attachment strap through the strap locating tabs.
- Thread cam buckle and secure.
- Your Piranha is now ready to dive!
DIVING
PRE-DIVING
Before diving your X-Scooter for the first time, the following procedure should be followed. Details of these tasks can be found later in the manual.
- Charge individual PTB modules.
- Install PTB modules in battery and press button to turn module on
- Connect like colored (red to red/black to black) battery connectors.
- Test trigger and motor are working correctly. Adjust reed switch if needed.
- Attach body and tail as described above ensuring nothing is caught in the O-Rings.
- Tighten trigger locking screw to avoid accidental activation. (Release just prior to use)
- Connect tow cord bolt snap to your tow cord attachment point.
- Adjust tow cord length using slip knot provided to obtain optimum riding position.
- Go diving following your conventional practice, using the scooter for propulsion as required.
Ensure you have a suitable attachment point for the tow-cord on your regular diving equipment. This attachment point is ideally a D-ring in the crotch area. If not, see your equipment supplier or Dive-Xtras.
POST-DIVING
The following steps should be followed within 1-2 hours after each dive:
- Rinse or spray down Piranha with fresh water for about 1 minute.
- Run Piranha briefly to dry propeller area.
- Quickly move trigger up and down multiple times to push water out of trigger area.
- Detach nose from battery section.
- Remove PTB modules from battery and charge.
- Store your Piranha in a cool, dry place.
WEIGHTING
The Piranha comes weighted and balanced from the factory for neutral buoyancy in fresh water. For saltwater use, install the provided weight plates. The weight plates come weighted for the brackish water in the Pacific Northwest region. For use in saltier water, such as the Red Sea or Mediterranean, add the black weight tabs supplied in your spares kit to ensure proper buoyancy.

For a P1 there are 3 saltwater plates:
- The nose plate, located under the nose
- The battery plate, located under the battery
- The tail plate, located on the battery, with the battery plate
For a P2 there are 4 saltwater plates:
- The nose plate, located under the nose
- Battery 1 plate, located under the battery
- Battery 2 plate, located under the battery
- The tail plate, located on the battery closest to the tail with the battery plate
For a P3 there are 5 saltwater plates:
- The nose plate, located under the nose
- Battery 1 plate, located under the battery
- Battery 2 plate, located under the battery
- Battery 3 plate, located under the battery
- The tail plate, located on the battery closest to the tail with the battery plate
ASSEMBLY/DISASSEMBLY
ASSEMBLING
- Check O-Rings for dirt and excessive grease.
- Remove, clean, and lightly lubricate O-rings if needed.
- Connect the tail to the battery with the red and black connectors.
- Place battery section onto scooter.
- Install 4 PTB modules and turn on the battery with the button
- Attach nose section to battery, ensuring the down arrow points towards the 6 o’clock position.
- Slide strap through the strap locating tabs on the nose.
- Route lower closure strap through cam band.
DISASSEMBLING
- Stand scooter on the tail.
- Release the cam band.
- Remove nose using the strap for leverage.
- Remove PTM modules and charge.
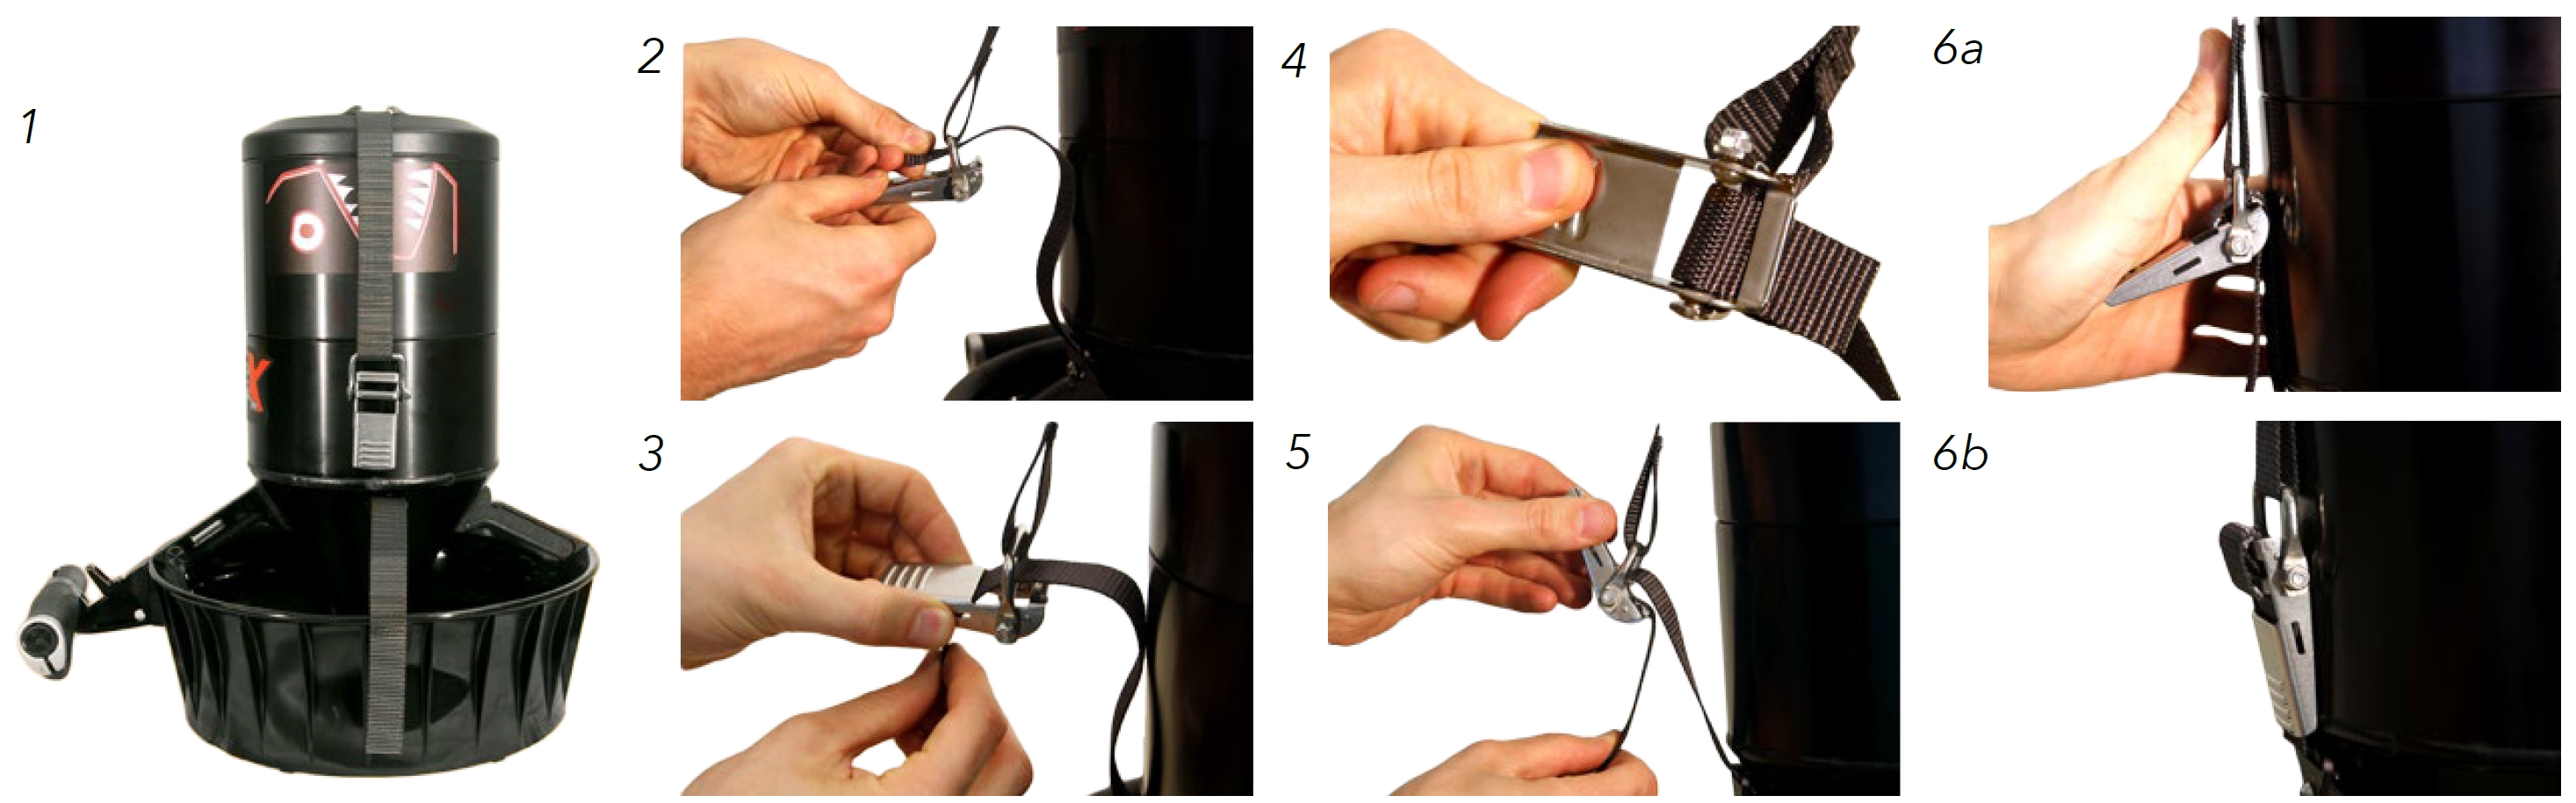
STRAP CLOSURE
- Place strap through nose tabs to ensure proper alignment of battery and nose.
- Bring lower strap through top of cam between U-bracket and cam.
- Bring lower strap through bottom hole in cam.
- Bring lower strap through top hole in cam.
- Feed strap down towards tail. Remember to keep the strap relatively loose as the cam will tighten the strap when it is closed.
- Snap the cam closed.
BATTERIES
Our new power tool battery is a huge improvement on previous scooter batteries. It's compatible with all Piranha scooters and can be used together with older batteries in P1 and P3 configurations.
The battery is a housing into which four power tool batteries (that you can source online or at your local hardware store) are dropped in to create a larger battery. This offers some huge advantages to you, the diver:
- Battery packs are available almost anywhere in the world.
- It can travel with you on regular airline flights. *
- Same size, weight, capacity, and power as the original Piranha battery
- No hazmat shipping when purchasing
- Easy to replace packs as they age and deteriorate.
*Each pack is less than 100wh and is compatible with current airline regulations.
To use, the purchaser will need to source their own power tool batteries as described below and the relevant chargers.
Compatible with 5Ah, 20v (USA only) or 18v batteries that fit the DCB interface.
We have tested with the following batteries:
- 4 x Enegitech 20V 5.0Ah Lithium Battery
- 4 x Batteriol 20V 5.0Ah Lithium Battery
- 4 x DeWalt DCB205 (USA) 20v Max 5.0Ah
- 4 x DeWalt DCB184 18v XR
A 5.0Ah pack must be used to achieve the rated performance. Other packs may work; however performance and buoyancy will be affected.
Battery is not compatible with all packs that fit the DCB interface. You can buy many different packs, with a wide range of capacities. ONLY 5Ah batteries will fit inside the PTB Module housing.
INSTALLING
- Ensure O-rings are in place, well lubricated, and do not have any cracks or gouges.
- Connect battery to the tail with the red and black electrical connectors.
- Set battery tube onto the tail section.
- Install 4 PTM modules, one in each slot, ensuring each is fully installed and locked in place
- Depress button on the battery to turn it one. If all is correct you will see all 4 LED's flashing with a Heartbeat. If there is a problem, you will not get a heartbeat and the LED associated with the bad PTB module will flash.
P2 & P3
To install batteries of the P2 and P3 models, follow the same instructions as installing one battery on to the motor section, but instead connect it to the previous battery. Each battery has two pairs of electrical connectors to allow you to do this.
Each battery must be turned on individually and the heartbeat checked for it to work.
CHARGING
Remove the PTB modules shortly after the dive and charge. Do not leave in the scooter as they may over discharge and be damaged.
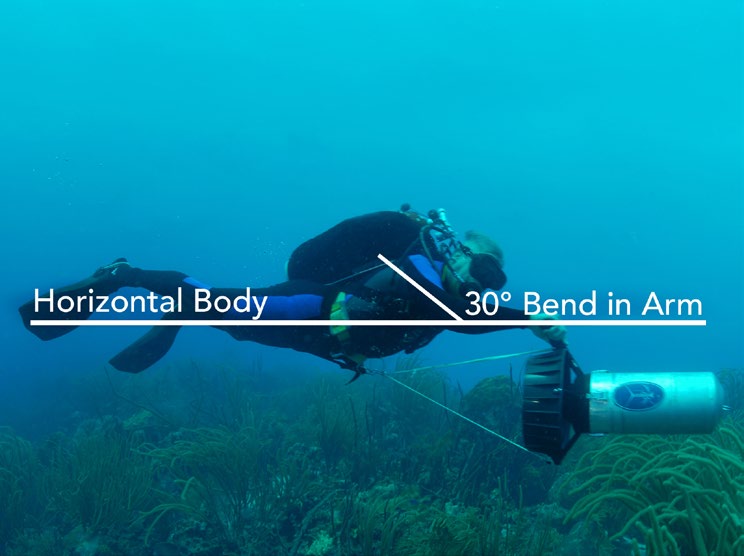
DIVER POSITION
The X-Scooter should tow the diver via the tow cord which is attached via the bolt snap to the diver’s tow cord attachment point. The diver should always endeavor to maintain a horizontal body position.
Only one hand (normally at 1 o’clock position) is used to activate the X-Scooter trigger and steer via the T-Handle. Two hands on the X-Scooter are not needed and the diver should not be pulled via the arms. Adjust length of tow cord to match drawing. If the diver is pulled by the arms and not the tow cord, fatigue will occur.
ON/OFF SWITCH & SPEED CONTROL
BASIC OPERATION
Pulling and holding the trigger will start the scooter propeller. Releasing the spring-loaded trigger will allow the trigger to return and stop the scooter.
SPEED CONTROL
To control the speed of the scooter, use the Trigger Shift on the Fly method to accelerate or decelerate through the gears.
TRIGGER
Dive Xtras has designed this trigger to have two position options, up or down. Usually, larger handed individuals prefer the trigger to be in the down position and smaller handed individuals prefer the trigger to be in the up position. To change the position of the trigger, use a 2.5mm Allen/hex key on the screw on the face of the trigger.
TRIGGER SHIFT ON THE FLY
Your scooter has several motor speeds. When you initially pull the trigger the X-Scooter will always start in speed 3. To adjust motor speeds up or down simply release and pull the trigger quickly (There should be no pause between the release and pull action). Performing this release and pull action twice (like double clicking a computer mouse) will make the X-Scooter motor go faster. Performing this release and pull action once will make the X-Scooter motor go slower. The speed of this action should be fast enough, so the X-Scooter does not stop running but not fast that it does not recognize the command. Once you have reached the top or bottom speed, further attempts to increase or decrease speeds respectively will be ignored by the scooter controls.
REED SWITCH
Correct trigger operation is dependent on the position of the reed switch. The position is set in the factory, but it may require adjustment over the life of the X-Scooter due to accidental movement. The reed switch position may be adjusted up or down on its mounting for correct operation. The reed switch should be adjusted so that the X-Scooter motor turns on at 50% of full trigger pull distance and remains on while you continue to pull to 100% full trigger pull.
GOPRO READY
GoPro® Hero cameras are the most popular action sports camera on the market. We have developed a mount that lets you flawlessly integrate your GoPro® Hero with your Piranha.
Simply slide your GoPro® Hero camera into the mount on the left-hand side of the handle. You now have a steady, secure place to film your dives.
In addition to integrating the GoPro® Hero cameras, the new mount system allows us to develop a neutrally buoyant gauge mounting system. Simply slide your compass or gauge mount onto the handle, and you're all set! With the ability to quickly change from a gauge to GoPro® Hero, you’ll never be far from a great video or a safe compass heading.
*Works with GoPro® Hero (2, 3, 3+, or 4) camera
*GoPro, Hero, the GoPro logo, and the GoPro Be a Hero logo are a trademark or registered trademarks of GoPro Inc.

DIVE PLANNING CONSIDERATIONS
The X-Scooter travels much faster than normal swimming speeds. If the user is diving in a buddy pair, they should be more vigilant of their buddy to avoid losing track of them at the increased speeds. These speeds may also increase the risk of collisions with objects and/or other divers especially in limited visibility situations. Always pay close attention to your buddy, where you are traveling, and to your speed to reduce the risk of these incidents occurring.
DISTANCE & RUNTIME
The X-Scooter is capable of traveling great distances. Therefore, if it is required that you have to return to the same point as you started the dive (the exit) and swimming out or ascending to the surface is not an option, then one should pay close attention to the runtimes of your X-Scooter. Users should empirically calculate their max runtimes from actual dives and plan accordingly using adequate safety margins.
SCOOTER FAILURE
The X-Scooter is extremely reliable. However, divers should always be prepared to deal with failures.
FLOODING
If the scooter floods on a dive, it may become significantly negative and become a risk to the user. The best option is to unclip the X-Scooter via the tow cord bolt snap and release it. This will eliminate the risk and you can safely exit.
X-SCOOTER NO LONGER RUNS
If your X-Scooter were to fail and stop running during a dive, you have several options:
- Swim the X-Scooter
If the X-Scooter is not flooded you can simply stow the X-Scooter by locking down the trigger and clipping it onto your person (in a low drag area, if possible, such as a chest D-ring) and then swimming it back. - Getting a tow from your buddy
If the X-Scooter is not flooded, your buddy can tow you and your failed scooter. The X-Scooter is capable of propelling 2 people for more limited distances and speed. - Release the X-Scooter
If the above techniques are unsuitable or increase risk to the user, the best option is to unclip the X-Scooter via the tow cord bolt snap and release it.
SCOOTER WON'T TURN OFF
A runaway X-Scooter can be hazardous, as it is a powerful vehicle. If improperly managed, a continuously running X-Scooter might initiate an uncontrolled ascent or decent. It is important to reduce the possibility of a runaway scooter by properly maintaining your X-Scooter and performing the pre-dive checks as discussed.
If your X-Scooter were to fail during the dive, you can do the following:
- Grabbing the Propeller
The X-Scooter is equipped with an electronic clutch that allows you to simply grab the propeller without suffering injury. This will stop the propeller, allowing you to gain control of the scooter. - Release the X-Scooter
If the above techniques are unsuitable or increase risk to the user, the best option is to unclip the X-Scooter via the tow cord bolt snap and release it.
MAINTENANCE FLOOD RECOVERY
AFTER EACH DIVE
- Rinse X-Scooter in fresh water after all saltwater dives.
- Clean and lubricate O-ring seals with silicone lube.
- Lubricate the trigger.
- Store in a cool, dry location with nose off scooter.
MONTHLY
- Check O-ring sealing surfaces for damage.
- Apply silicone to trigger mechanism and locking screw.
- Check tightness of all fasteners. Most importantly, the propeller, handle, and motor.
- Check electrical connectors for corrosion, and clean if necessary.
YEARLY
Service your scooter at a Premiere Partner or approved service center.
STANDARD SPARE KIT
Dive Xtras recommends all users carry a basic spares kit. Spares kits are available from Dive Xtras. Minimum spares kit should contain:
- O-rings
- Prop Seal
- Trigger Locking Screw
The X-Scooter is designed to be highly resistant to water ingress of any kind, however as life is unpredictable, these instructions have been provided to help you minimize the damage done in the unlikely event a flood occurs.
In any flooding event, time is of the essence, so if you do inadvertently flood your X-Scooter, be sure to find and fix the problem ASAP and certainly before attempting to dive with it again. The faster you can get everything rinsed and dry, the less damage will be done. Keep in mind that these instructions are intended for dealing with real flooding only, not for condensation or drops from wet dive gear!
SALTWATER BODY COMPARTMENT
Dunk entire tail in fresh water and agitate well for 5 minutes. Drain and leave in a warm, dry place until 100% dry. Wipe body and battery dry, clean fuse holder and electrical connectors. Damage will be minimal. (Motor bearings may become noisy and require changing)
FRESHWATER IN BODY COMPARTMENT
Drain and leave in a warm dry place until 100% dry. Wipe body and battery dry, clean fuse holder and electrical connectors. Damage will be negligible.
SALTWATER IN BATTERY COMPARTMENT
Dunk entire battery in fresh water and agitate well for 5 minutes. Drain and leave in a warm dry place until 100% dry. Damage will be severe. Most likely the pack will be unusable. At best it will still function, but with a dramatically reduced cycle life.
FRESHWATER IN BATTERY COMPARTMENT
Drain and leave in a warm dry place until 100% dry. Damage will be severe. Most likely the pack will be unusable. At best it will still function, but with a dramatically reduced cycle life.
RoHS & WEEE COMPLIANCE
RoHS STATEMENT (RESTRICTION OF HAZARDOUS SUBSTANCES)
Dive Xtras Inc. is committed to complying with all applicable laws and regulations, including the European Union Restriction of hazardous Substances (RoHS) Directive that restricts the use of hazardous materials in electronics products. The company continues to work toward the reduction of RoHS materials in our products which are subject to the RoHS Directive, expect where it is widely recognized that there is no technically feasible alternative.
WEEE COMPLIANCE (WASTE ELECTRICAL & ELECTRONIC EQUIPMENT)
On January 27, 2003, the European Parliament and the Council of the European Union authorized Directive 2002/96/EC or WEEE (Waste Electrical and Electronic Equipment). The aim of the directive is to halt the growing volume of electric and electronic (EEE) waste disposed of in landfill sites.
Dive Xtras, Inc. has evaluated its product lines against the criteria set forth in the WEEE directive. As required by the legislation, any Dive Xtras product covered by the directive and sold in the EU after August 13, 2005, is marked with the Wheeled Bin symbol, inserted in the owner’s manual or on the packaging. Dive Xtras Inc. uses the symbol based on the EN 50419:2005 CENELEC standard.
DISPOSAL OF ELECTRICAL & ELECTRONIC WASTE
At the end of the products life, customers should return their electrical and electronic waste in Dive Xtras, Inc. products back to the appropriate company. The appropriate company will be marked on the label. (Example below: Li-Ion battery from All Cell Technologies.) Where it can be recycled and treated appropriately. Alternatively, a local disposal option may be used if appropriate. Any EEE replaced during a factory repair will be handled appropriately by the company.